Installing code-server Using a One-Click Script
1. Background
Recently, to better monitor my campus check-in status, I used Python’s schedule library combined with the email library to automatically check log file contents at scheduled times and send the results to my email for easy verification. Since I needed to run this Python script in the background, I thought of a technique I covered in a Bilibili video last summer - screen sessions. By creating a new screen session, running the Python script in it, and then detaching the session from the Linux terminal, I could keep the session running 24/7 in the background.
While exploring screen sessions, I checked the code-server documentation on GitHub. I found that the instructions described using a one-click installation script. So I decided to update the code-server installation process.
2. Installing code-server Using the One-Click Script
The official GitHub repository provides a one-click installation script method:
|
|
Explanation of the script:
# curl is a command-line tool that makes network requests, retrieves and extracts data,
# and displays it on "standard output" (stdout).
##################################################################################
# Explanation of -fsSL:
# -f (--fail) prevents returning an HTML page showing the error reason on server errors,
# instead having curl return error code 22 to indicate the error.
# -s, --silent: Silent mode. Doesn't show progress bar or error messages.
# Makes curl quiet. It still outputs requested data, potentially to terminal stdout,
# unless redirected.
# -S, --show-error: When used with -s, --silent, makes curl show error messages on failure.
# -L, --location: If the server reports the requested page has moved (with location: header
# and 3xx response code), this option makes curl redo the request at the new location.
##################################################################################
# curl -fsSL URL: This command is typically used for downloading files.
##################################################################################
# | is the Linux pipe operator. The output of the command before the pipe becomes
# the input for the command after the pipe.
##################################################################################
# sh stands for shell, its purpose is to let the shell execute shell scripts.
##################################################################################
# The above command downloads a .sh shell script using curl and executes it.
Linux Pipe Command with Examples
2.1. Demonstration of curl -fsSL https://code-server.dev/install.sh
As you can see, curl -fsSL simply outputs the shell script content to the terminal.
By adding the pipe operator |, the shell script content becomes input for the subsequent command, which calls the shell to execute the script content.
The official GitHub repository README also has this command, which lets you preview what will happen during installation. Simply put, it displays the shell script’s commands and process in the terminal without actually executing the script.
|
|
2.2. Demonstration of curl -fsSL https://code-server.dev/install.sh | sh -s --dry-run
|
|
This shell script executes 4 commands. Their meanings are:
The first command creates a directory. The -p parameter means when creating nested directories,
if a parent directory doesn't exist, it will be created as well.
##################################################################################
Explanation of #fL parameters in the second command:
# : Shows transfer progress with a simple progress bar.
-f (--fail) prevents returning an HTML page showing error reasons on server errors,
instead having curl return error code 22.
-L, --location: If server reports the page has moved (with location: header and 3xx
response code), makes curl redo the request at the new location.
##################################################################################
-o: Write output to file
##################################################################################
-C -: -C parameter continues previous file transfer at given offset. Using -C - tells
curl where to resume the transfer from.
Summary: Downloads the code-server GitHub package and writes it to the specified file location.
##################################################################################
The third command renames the code-server package.
##################################################################################
The fourth command installs code-server.
dpkg is the Debian family package management tool, -i parameter means install.
2.3. Demonstration of curl -fsSL https://code-server.dev/install.sh | sh
Since I had run this before, running it again is very fast. The first execution includes an installation process.
3. Configuration
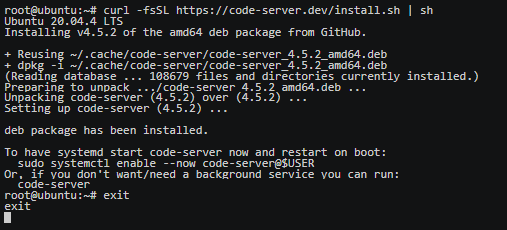
After running the one-click script, you’ll see the terminal prompt shown above.
This message means if you want code-server to keep running in the background, you can execute the following command:
|
|
If you don’t need a backend service, you can simply run the code-server command.
Initially, after running the code-server command and opening port 8080 on the server, entering ip:8080 in the browser address bar failed to connect.
You need to modify the configuration file, located at ~/.config/code-server/config.yaml. The config file path is shown in the terminal when you run the code-server command.
vi ~/.config/code-server/config.yaml - Edit the code-server configuration file with vim editor. Change the password to one you’ll remember, and change 127.0.0.1 to 0.0.0.0. On a server, 0.0.0.0 refers to all IPv4 addresses on the machine. If a service on a host binds and listens on 0.0.0.0:port, you can access that service via the server’s public IP:port.
3.1. Demonstration of sudo systemctl enable --now code-server@$USER
After this, as long as your server is running and the port is open, you can access it via ip:port in the address bar.
3.2. Accessing code-server via Domain Name Instead of Domain:Port
You can add an A record in your DNS management console with host record *, pointing to your server’s IP address. This means any request to *.example.com (like A.example.com, B.example.com) will be forwarded to your server.
Then you can install an nginx reverse proxy server to handle requests to your server. You can forward requests to different ports based on different domain host records, providing corresponding services. Add the following configuration block to your nginx config file (this configuration forwards requests to A.example.com to the local code-server service port, so you’ll receive code-server’s response):
|
|
3.3. How to Completely Remove code-server
|
|
Afterword: In my opinion, code-server is at most a toy. For real server-side development, you can use VS Code’s remote SSH plugins to connect to the server and access remote server resources from VS Code on your laptop.
Document Info
- License: Free to share - Non-commercial - No derivatives - Attribution required (CC BY-NC-ND 4.0)